On the Subject of The Inverted Black Cipher

Black as the world it came from, this cipher will be the end of you.

On the module, you will see 3 screens, a keyboard, 2 buttons with a letter on it, and a submit button that displays the current page you’re on.

Pressing the right arrow takes you to the next page. Pressing the left arrow takes you to the previous page. There is a total of 2 pages.

On page 1, the top screen shows a 6 letter encrypted word, the middle and bottom screens shows a word.

On page 2, the top screen shows a letter followed by 3 roman numerals, the middle screen shows 3 letters, and the bottom screen shows some letter pairs.

Step 1: Enigma Cipher

For this, you’re going to need the encrypted word from the top screen of page 1, and all 3 screens from page 2.

On page 2 of the module, you will see a configuration of the rotors/reflector, the rotors setup below that, and a plugboard setup on the bottom.

Step 1A: Configuration of the Rotors/Reflector/Plugboard

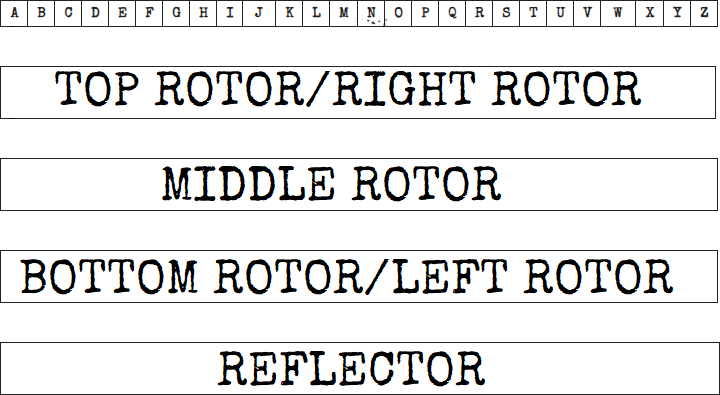
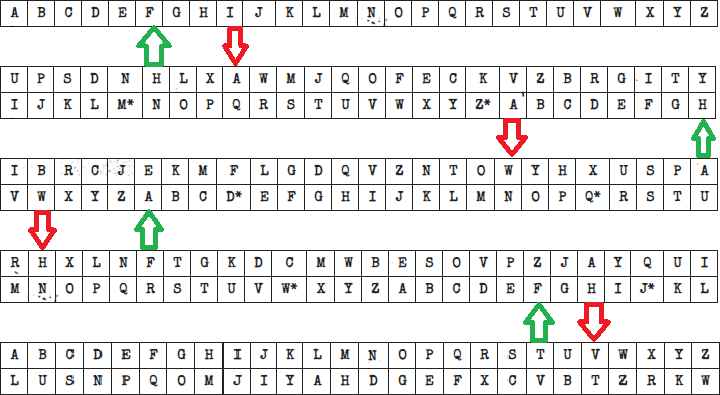
The screen at the top shows what type of rotors are used, the order they are in, and which reflector is used. Use the correct rotor charts and correct reflector chart to use to create an Enigma Decryptor.

They are read in this order: Reflector-Bottom Rotor-Middle Rotor-Top Rotor. Above the top rotor, you will type A–Z to use as the plugboard.

Use the schematic at the bottom to help you create the Enigma Decryptor.

The rotors below the screen shows what letter each one is at. Shift the letters until the bottom left letter is equal to the letter on the rotor.

For each pair of letters on the plugboard setup, switch the 2 letters positions on your plugboard.

Enigma Schematic

After you set it all up, you are ready to use it. First do step 3B to decrypt the first letter of the encrypted word. Then rotate the rotors shown in step 3C.

Step 1B: Using the Enigma Decryptor

  • 1: Take the letter of your word and find it on the plugboard row of the decryptor.
  • 2: Go straight down to the top row of the top rotor to receive a new letter.
  • 3: Find the new letter in the bottom row of the top rotor.
  • 4: Go straight down to the top row of the middle rotor to receive a new letter.
  • 5: Find the new letter in the bottom row of the middle rotor.
  • 6: Go straight down to the top row of the bottom rotor to receive a new letter.
  • 7: Find the new letter in the bottom row of the bottom rotor.
  • 8: Go straight down to the top row of the reflector to receive a new letter.
  • 9: Find the new letter in the bottom row of the reflector.
  • 10: Go straight up to the bottom row of the bottom rotor to receive a new letter.
  • 11: Find the new letter in the top row of the bottom rotor.
  • 12: Go straight up to the bottom row of the middle rotor to receive a new letter.
  • 13: Find the new letter in the top row of the middle rotor.
  • 14: Go straight up to the bottom row of the top rotor to receive a new letter.
  • 15: Find the new letter in the top row of the top rotor.
  • 16: Go straight up to the plugboard row to receive your decrypted letter.

The example below uses I as the letter which will decrypt it to F.

Step 1C: Rotor Turning Mechanics

This next section talks about how rotor turning mechanics work.

You will notice a couple letters on the bottom row of the rotors have an * next to them. Depending on which rotor it’s on will have different effects:

  • If the asterisk is at the leftmost edge of the middle rotor, all 3 rotors will turn
  • Otherwise, if the asterisk is at the left most edge of the right/top rotor, both the middle and top/right rotor will turn.
  • Otherwise, only the right/top rotor will turn
  • Each turn only goes up 1 step on the rotor (Ex: A -> B, G -> H, Z -> A, etc.)

Repeat steps 3B and 3C for each letter of your word to get a new encrypted word.

Step 2: Scytale Transposition

For this, you will need the encrypted word you got from step 1.

First determine how many rows will be used by taking the 2nd character in the serial number (A = 10, B = 11, ... Z = 35), modulo 4, plus 2.

For each encrypted letter, write them top to bottom, left to right equal to the number of rows.

Finally read the letters left to right, top to bottom to get your new encrypted word.

You should now have a new encrypted word.

Example

Encrypted word: UWHJIV
Number of Rows: N % 4 = 3 + 2 = 5
UV
W  
H  
J  
I  
New Encrypted Word: UVWHJI

Step 3: Modified Digrafid Cipher

For this, you’re going to need the encrypted word you got from step 2, and the words on the middle and bottom screens on page 1, and the letters on the 2 buttons.

The middle and bottom screens will be used to make 2 keys.

Using the middle screen word, removing any duplicate letters, removing all 2nd or more occurrences. Take the entire alphabet and remove all the letters shown in this word.

If alphabetic position (A = 1,B = 2...Z = 26) of the first letter of the serial number is odd, put the alphabet at the end of the word.
Otherwise, put the alphabet in front of the word.

This will be known as Key A.

Using the bottom screen word, removing any duplicate letters, removing all 2nd or more occurrences. Take the entire alphabet and remove all the letters shown in this word.

If alphabetic position (A = 1,B = 2...Z = 26) of the last letter of the serial number is even, put the alphabet at the end of the word.
Otherwise, put the alphabet in front of the word.

This will be known as Key B.

The letter shown on the left button above the page number/submit button is the letter that will be replaced by a #, then add the letter at the end in Key A. Do the same with the right button and Key B. If it’s a #, place the # at the end.

Split Key A and B into 3 equal rows of 9 letters, left to right, top to bottom.

Finally, put Key A above a string of arabic numerals going from 1–9 and put another string of arabic numerals going from 1–9 on the side in reading order forming a 3×3 square. Then take Key B and put it below the string numbers where Key A is, then put a string of arabic numerals going from 1–9 on the side going top to bottom, left to right forming a 3×3 square.

Example

Key A: B#DEFGHIJKLMNOQRUVWXYZPASTC
Key B: ACFGHIJKMNPQRSTVWX#ZDOUBLEY

B#DEFGHIJ123
KLMNOQRUV456
WXYZPASTC789
123456789---
ACFGHIJKM147
NPQRSTVWX258
#ZDOUBLEY369

Split the encrypted word into 3 letter pairs. Do the following for each letter pair:

  • 1: Find the first letter in Key A.
  • 2: Find the second letter in Key B.
  • 3: Use the column of the first letter to get the 1st number.
  • 4: Use the column of the second letter to get the 3rd number.
  • 5: Find the rows of both letters and look at the 3×3 number grids, one number will be on both and that is the 2nd number.
  • 6: Write the number top to bottom, to the right of any previous numbers.

Now read the 3 number combinations in reading order to get new numbers. For each 3 number combination do the following:

  • 1: Take the first number as the column and the second as the row on the top to get the first letter
  • 2: Take the third number as the column and the second as the row on the bottom to get the second letter
  • NOTE: The top square will be used for the first letter and the bottom for the second

After all that, you should now have a decrypted word.

Example

Encrypted word: UVWHJI
Key: Use the table above for the decryption process.

UV -> 857
WH -> 175
JI -> 916

Rearranging numbers so it’s top to bottom, left to right.
819
571
756
Read it, left to right, top to bottom.

819 -> IM
571 -> PA
756 -> RT
Decrypted Word: IMPART

Once you finally have your decrypted word, you can submit it. Once you start typing, all the screens will go black and the bottom screen will show what you are typing.

To clear it, just click one of the arrows. This goes to one of the pages and clears any input you put in. It will not let you go over 6 letters on input.

Once you are satisfied with your input, press the button labeled "SUB" to submit your answer. On a strike, the module will go back to the first page of the module, but it does not regenerate.