On the Subject of Forget Enigma
“My mind is like an enigma.” - the bomb
On the module, you will see a configuration of the rotors/reflector, the rotors set up below that, and a keyboard that lights up a single letter.
Every time a non-ignored module is solved, the stage number goes up by 1, the rotors turn, and a new letter will light up.
To disarm this module, you have to decrypt the letter using the mechanics down below.
Step 1: Configuration of the Rotors/Reflector
The screen at top shows what type of rotors are used, the order they are in, and which reflector is used. Use the correct rotor charts and correct reflector chart to use to create an Enigma Decryptor.
They are read in this order: Reflector-Bottom Rotor-Top Rotor. Above the top rotor, you will type A–Z to use as the keyboard.
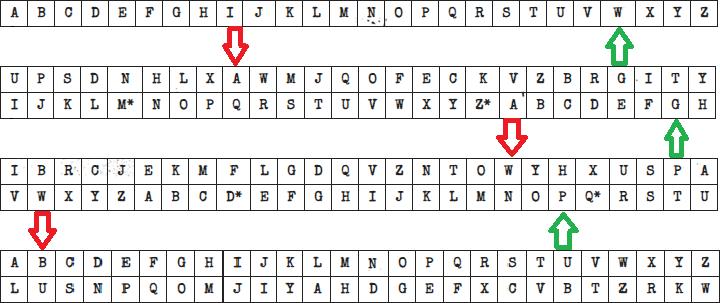
Use the schematic at the bottom to help you create the Enigma Decryptor.
The rotors below the screen shows what letter each one is at. Shift the letters until the bottom left letter is equal to the letter on the rotor.
Rotor I
| E | K | M | F | L | G | D | Q | V | Z | N | T | O | W | Y | H | X | U | S | P | A | I | B | R | C | J |
|---|---|---|---|---|---|---|---|---|---|---|---|---|---|---|---|---|---|---|---|---|---|---|---|---|---|
| A | B | C | D* | E | F | G | H | I | J | K | L | M | N | O | P | Q* | R | S | T | U | V | W | X | Y | Z |
Rotor II
| A | J | D | K | S | I | R | U | X | B | L | H | W | T | M | C | Q | G | Z | N | P | Y | F | V | O | E |
|---|---|---|---|---|---|---|---|---|---|---|---|---|---|---|---|---|---|---|---|---|---|---|---|---|---|
| A | B | C | D | E* | F | G | H | I | J | K | L | M | N | O | P | Q | R* | S | T | U | V | W | X | Y | Z |
Rotor III
| B | D | F | H | J | L | C | P | R | T | X | V | Z | N | Y | E | I | W | G | A | K | M | U | S | Q | O |
|---|---|---|---|---|---|---|---|---|---|---|---|---|---|---|---|---|---|---|---|---|---|---|---|---|---|
| A | B | C | D | E | F | G | H | I* | J | K | L | M | N | O | P | Q | R | S | T | U | V* | W | X | Y | Z |
Rotor IV
| E | S | O | V | P | Z | J | A | Y | Q | U | I | R | H | X | L | N | F | T | G | K | D | C | M | W | B |
|---|---|---|---|---|---|---|---|---|---|---|---|---|---|---|---|---|---|---|---|---|---|---|---|---|---|
| A | B | C | D | E | F | G | H | I | J* | K | L | M | N | O | P | Q | R | S | T | U | V | W* | X | Y | Z |