On the Subject of Outrageous

I don’t think words can explain what the hell happened at the factory.

This module consists of 36 glyphs depicting mythical creatures, an LED in the top-left, and a start button at the bottom. These glyphs, when decoded and decrypted, give a 6-letter word. Submit the correct sequence of button presses after pressing the start button to solve the module. If an incorrect sequence is entered this module will strike and reset with new glyphs.

Step 1: Glyph Decoding

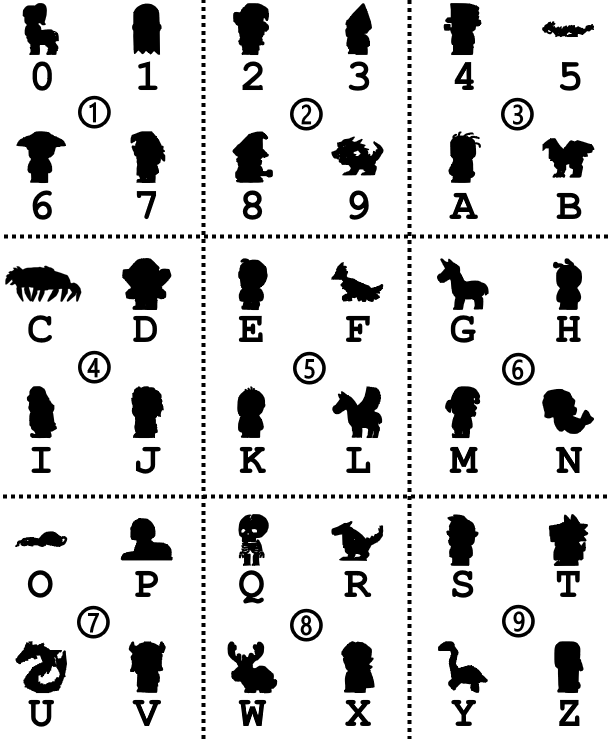
Each glyph represents a character, simply use the image to the left to decode the glyph. Hovering over a glyph will show only that glyph with a larger size.

These glyphs when put in reading order then decoded create the ciphertext. Glyphs can appear more than once on the module.

Note that there are 9 different groups that these characters can be a part of. This will become relevant in the final step.

Step 2: Creating the Initial Cipher Sequence

This step will generate a sequence of all 36 characters used for the next step.

Calculate X by taking the sum of the alphabetic positions of all letters on the indicators on the bomb, then taking that sum modulo 36. If X shares a factor with 36 (ignoring 1), add 1 to X until it doesn’t (making sure it stays in the range 0–35).

The nth character in the sequence is the kth character in the serial number, where k is ((n-1)%6) + 1. If the character has already appeared previously in the sequence, add X until it hasn’t (making sure it stays in the range 0–35, convert these to base 36). If X becomes 0, make it 1 instead.

The resulting sequence is the initial cipher sequence.

Step 3: Creating the Cipher Keys

To generate each of the six cipher keys, start with the sequence from the previous cipher key. (For the first cipher key, use the initial cipher sequence). Each nth cipher key is based on the nth character of the serial number.

If the serial number character at that position is a letter, take the characters of the cipher key and create a triangle where each row has one more character than the last, and place the characters in reading order within the triangle. Then rotate this triangle 120° clockwise. Then take each of the characters in reading order. This final sequence is this key.

If the serial number character at that position is a number, take the characters of the cipher key and create a square where each row is 6 characters long, and place the characters in reading order within the square. Then rotate this square 90° clockwise. Then take each of the characters in reading order. This final sequence is this key.

Step 4: Decrypting the Ciphertext

To decrypt characters of the ciphertext, simply take the gth character of the key, where g is the position of that ciphertext character in the following string: “0123456789ABCDEFGHIJKLMNOPQRSTUVWXYZ” (so 0 becomes the 1st character in the key, 1 becomes the 2nd, and so on). The top row of the ciphertext is used to decrypt the 1st key, the 2nd row is used to decrypt the 2nd key, and so on.

The six decrypted ciphertexts, when placed on top of each other (so the decryption from the 1st key is on top, 2nd key is the second row, and so on), create a 6×6 grid of characters. There will be a single 6-letter word present within the grid.

To get the resulting number you must input into the module, take the position of each letter in the word and rotate it 90° counterclockwise. The resulting characters in those positions is the input word. To get your input number, convert the characters in the input word to the group they are part of on the first page. This is the number you will input into the module.

Step 5: Generating the Input Sequence

To determine the format of the input sequence, take the direction of the starting word in the 6×6 grid going from the start of the word to the end of the word. In the following table, n represents a digit and D represents a direction.

DnnnDnnnDnnDnnDnnDDnnDnnDnn
nnnDnnnDDDDnnnDnnn
nnDnDnDnnnnnDDDnnnnDnnDnnDn

Step 6: Submitting the Answer

When you have your answer, you can attempt to submit it by pressing the start button. Once pressed, the module will have 9 numbered buttons in the center and 4 direction buttons on the sides of the module.

The time in which you insert a direction into the sequence is dictated by the format of the input sequence.

The LED will light up every 5 seconds after the start button is pressed. The direction you must press is determined by the LED. If you do not press a direction within the 5 seconds, the module will strike and reset.

If the LED is...

red, press up.
green, press left.blue, press right.
white, press down.