On the Subject of Robit Programming

This is not simply Maze Identification nor Robot Programming. This module is on a whole other level.

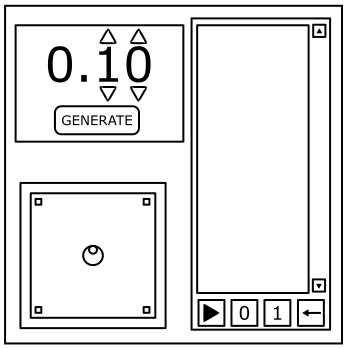
On the module is a giant square which is the interface used for viewing the maze. Initially, the module will show a “Generate” button and a numeric display denoting how much delay the module generates its mazes, 0.00 being instant, 1.00 being 1 step every 1 second.

Pressing the “Generate” button will start creating the maze by carving out the giant square at a specified delay which can be customized for the defuser. The defuser can press the “Generate” button to generate a new maze until the defuser finds one that is sufficient. Generating the maze for the first time on the module also reveals a terminal on the right of the maze.

To disarm the module, the defuser must figure out how the maze was generated, and the expert must modify the starting instructions to grab the combination of bits that tells the robit to move in a specific direction. The robit must be guided to the 4 corners of the provided quadrants, noted by the small square on each, and then move towards the middle row/column of the maze to disarm the module. The four quadrants may also modify the robit’s behavior when its corner has not been visited yet.

The terminal consists of a screen with a highlight denoting the current pair the robit is scanning. On the initial activation or when inputs are cleared, there would be no highlighted instruction. The defuser can input a series of 1’s or 0’s on the terminal and can scroll the instruction sets with the up or down keys. The backspace button to the right of the 0 and 1 buttons can be used to delete the previous inputs. If that button is held for a few seconds, it will clear ALL inputted bits from the terminal. The play button on the terminal starts the robit and allows the robit to process the provided bits. The defuser will not be able to regenerate a maze or adjust the delay on how the maze is generated, so caution is advised when pressing the play button.

Once the expert figures out each quadrant’s quirks and starting instructions, determined from steps 2 and 3 from the manual, have the defuser request the directions to all four corners in any order, and then anywhere in the center row/column. Modify these directions based on the quadrant the robit will be on and then use the bit table determined on step 2 to create a string of bits to input. If an odd number of bits were inputted onto the terminal and the robit reaches the lone bit, the lone bit will not be processed instead and the highlight will not mark at the lone bit instead. A strike will occur if the robit crashes into a wall or runs out of processable commands while in an quadrant whose corner is not collected.

Step 1: Figuring Out How The Maze Was Generated

The maze generated from this module is random however how the maze generates can be predicted with repeated regenerations of that maze.

For ease of access, a red cube is placed to point where the current position is during its corridor generating and checking procedures. Dark blue cubes may also be placed to denote special properties of that algorithm. This table consists of each algorithm used in this module and their respective descriptions on how the algorithm determines when generating a maze.

Maze Algorithm Description
Recursive Backtracking Pick a cell to start. Pick a random adjacent unvisited cell, visit it, and connect it to the previously visited cell, marking the direction of the previously visited cell onto the current cell. If there are no adjacent unvisited cells, backtrack to the previously visited cell. The maze is fully generated once there are no adjacent unvisited cells to the starting cell upon backtracking.
Binary Tree Pick a corner to use as a pivot. For each cell, excluding the previously chosen corner, consider its two directions toward the pivot, and randomly pick one of those directions to remove the corresponding wall from, such that the cell does not lead out of the maze.
Hunt And Kill See Recursive Backtracking, with the following alteration: If there are no adjacent unvisited cells, do not backtrack, and instead scan in one of the following ways: randomly, row by row, or column by column until it finds any unvisited cell adjacent to a visited cell.
Prim’s One of the “minimal spanning tree algorithms.” Pick a cell to start, and add its adjacent cells to a list. Until this list is empty, pick a random cell from this list, remove it from the list, mark it as visited, add its adjacent unvisited cells to the list, and randomly pick one of its adjacent visited cells to connect to.
Kruskal’s One of the “minimal spanning tree algorithms.” Initialise every cell to be of different groups. Select a random wall and check if the two cells adjacent to that wall are from different groups, if so remove the wall and merge the two groups together; otherwise, do nothing. Repeat until all walls have been considered.

Step 1: Figuring Out How The Maze Was Generated (Continued)

Maze Algorithm Description
Aldous-Broder Pick a cell to start. Until all cells have been visited, walk in a random direction to a cell and connect that cell towards the previous cell if the cell has not been visited before, otherwise do nothing.
This algorithm may take a long time to generate a maze.
Wilson’s Picks a random cell to mark as a branch. Until all cells are branched, pick a random unbranched cell and repeat the following: pick a random direction that doesn't lead out of the maze, mark the cell with that direction [potentially overwriting any previously marked directions], and walk in that direction to a new cell. If the new cell is branched, start at the starting unbranched cell, and continuously walk in the marked directions, removing walls along the way, until the branched cell is reached. Discard any unused directions.
This algorithm may take a long time to generate a maze.
Sidewinder Choose a row/column to start, and remove all walls connecting cells within that row/column. Then, for the next row/column, randomly pick between connecting cells within that row/column to form a group or connecting a random cell in that group to the previous row/column. If no more cells in the row/column can be added to the group, connect the group to the previous row/column.
Eller’s Choose a row/column to start, and randomly connect the cells in that row/column into groups. For each group, randomly connect toward the next row/column. For the next rows/columns, randomly connect cells within the row/column that are not in the same group, then randomly connect each group towards the next row/column.
Growing Tree Choose a starting cell and add it to a list. Until this list is empty, randomly choose between picking the newest cell added to the list, or picking a random cell from the list. If there are no adjacent unvisited cells to this cell, remove the cell from the list, otherwise connect a random such cell to this cell, adding the new cell to the list.
Recursive Division Start by removing all walls from the maze. Divide the space into two by placing a vertical/horizontal wall spanning the space, and randomly pick a wall to remove, connecting the two subspaces. Continuously divide the space until all subspaces are 1-wide or 1-tall.

Step 2: Obtaining The Starting Instructions

Once the defuser has figured out how the maze was generated, the expert must then grab the set of starting instructions based on how the maze was generated. Certain mazes that are generated will have their respective biases noted in the table which may alter the starting instructions. In the table provided, “Up”, “Down”, “Left”, and “Right” are all abbreviated as a single letter for that given direction in the bit pair as “U”, “D”, “L”, “R” respectively.

Maze Algorithm Starting Instructions
Recursive Backtracking
00 01 10 11
U D L R
Aldous-Broder
00 01 10 11
L U R D
Binary Tree

Determined Skew

North-West Skew
00 01 10 11
D L U R
North-East Skew
00 01 10 11
U R D L
South-West Skew
00 01 10 11
L D R U
South-East Skew
00 01 10 11
R U L D
Prim’s
00 01 10 11
U L D R
Kruskal’s
00 01 10 11
U R L D
Growing Tree
00 01 10 11
L R D U
Wilson’s
00 01 10 11
D L R U

Step 2: Obtaining The Starting Instructions (Continued)

Maze Algorithm Starting Instructions
Hunt And Kill

Unvisited Cell Scanning Order

Scanning Randomly
00 01 10 11
L R U D
Scanning Row per Row
00 01 10 11
L U D R
Scanning Otherwise...
00 01 10 11
L D U R
Sidewinder

First Edge Corridor Generated From This Algorithm

North Corridor
00 01 10 11
D R L U
West Corridor
00 01 10 11
R D L U
East Corridor
00 01 10 11
R D U L
South Corridor
00 01 10 11
D R U L
Eller’s

Grouping Order

Row Per Row
00 01 10 11
U D R L
Col Per Col
00 01 10 11
D U L R
Recursive Division
00 01 10 11
D U R L

Step 3: Determine the Quadrant’s Quirks

Each quadrant is colored one of 7 different possibilities with each of these modifying the behavior of the robit. When the move is performed on that quadrant, the robit may move in a direction that does not exactly match up with the bit table obtained from the previous step. Once the robit has reached the corner of the given quadrant or leaves the given quadrant, the quadrant’s quirk will stop applying. When the robit is at the axis of the maze (the center row/column), no quirk would apply to that command. Performed commands/moves refer to the previous number of moves/commands processed. If the robit crashes while in the quadrant, the number of performed moves will not change unless the instructions are modified before restarting the robit. Modifying the instructions also resets the number of performed commands down to 0 for that robit.

Common colors are found on this page. These colors on this table may repeat on the module.

Quadrant Color Quirk
Red The robit moves in opposite directions while in that quadrant in repsect of the command provided.
(L → R, R → L, U → D, D → U)
Magenta While in this quadrant, if the number of performed commands so far is divisible by 4, the robit may not move for 1 command. This will skip the highlighted instruction given by this robit. Skipped instructions WILL count for performed commands.
Green If the number of performed commands so far is even, perform the red quirk while the robit is in the quadrant. Otherwise, perform like there is no quirk.
Blue Perform the red quirk if the Xth character of the serial number is a digit, where X is the number of commands the robit has performed so far, modulo 6, plus 1. Otherwise, perform like there is no quirk.

Step 3: Determine the Quadrant’s Quirks (Continued)

This table continues from the previous page. These are rarer colors that can show up on the module. At most one of these can show up.

Quadrant Color Quirk
Yellow While the robit is in this quadrant, rotate the directions the robit will actually go by 90° clockwise for every command the robit has performed overall. For clarification:
For 4N commands, (U → U, R → R, D → D, L → L).
For 4N+1 commands, (U → R, R → D, D → L, L → U).
For 4N+2 commands, (U → D, R → L, D → U, L → R).
For 4N+3 commands, (U → L, R → U, D → R, L → D).
Gray If the number of moves the robit has performed overall is divisible by 10 while the robit is in this quadrant, forcibly pause the robit after the next instruction. This requires the defuser to manually resume the robit’s instructions.
Orange

Take the number of commands the robit has performed so far and modulo this by 15. Add 1 and count this many tiles in this table provided underneath, starting from the left. If that tile is a “-”, the red quirk will be applied. Otherwise, if that tile is “X”, the robit will be forcibly paused at the end of the move. Otherwise, there is no quirk.

X * * - - * * - * - * - * * -